⬇ Download & run⬇ 下載與執行
You need the custom AprNes. The temperature knob is not in stock AprNes or any other emulator — it lives only in the AprVisual project's special build (tools/aprnes/), where the PPU open-bus latch is modelled as a temperature-dependent decay. The Celsius read-out is calibrated to that build (the count depends on its exact loop timing). The ROM initialises its own palette + attributes, so the text renders on any emulator — but the number only lands in our calibrated 0–100 °C range if that emulator's open-bus decay timing is close to ours. If it decays much faster (e.g. a coarse fixed-tick counter) the reading clamps hot to 100; if it never decays, the count never terminates and the no-hang guard shows --. In other words the four-emulator survey below is really about how each emulator models open bus, not about temperature. (That survey image was captured with the earlier 0.0–51.1 °C decimal build; under the current 0–100 °C integer table the same four classify identically — only the clamp-hot value moves from 51.1 to 100.) Grab the packaged build below, or build it yourself from tools/aprnes/.你需要特製版 AprNes。溫度旋鈕不在原版 AprNes、也不在任何其他模擬器裡 —— 它只存在於 AprVisual 專案的特製 build(tools/aprnes/),那裡把 PPU open-bus 閂鎖建模成溫度相關衰減。攝氏讀值是對那個 build 校準的(計數依賴它確切的迴圈時序)。ROM 會自己初始化調色盤 + 屬性,文字在任何模擬器都顯示得出來 —— 但那個數字只有在該模擬器的 open-bus 衰減時序跟我們接近時,才會落在我們校準的 0–100 °C 範圍內。若它衰減快很多(例如粗略的固定-tick 計數器),讀值會夾到最熱的 100;若完全不衰減,計數永不結束、防卡死保護顯示 --。換句話說,下面那張四模擬器圖其實是在講各家怎麼模擬 open bus、不是溫度。(那張圖是用較早的 0.0–51.1 °C 十進位 build 拍的;在現在的 0–100 °C 整數表下,這四家分類完全相同 —— 只有「夾到最熱」的值從 51.1 變成 100。)下面直接抓打包好的 build,或自己從 tools/aprnes/ 建。
aprnes-custom.zip — the custom emulator, ~240 KB (Win + .NET Fx 4.8.1)特製模擬器,~240 KB(Win + .NET Fx 4.8.1) thermo.nes — ROM, 24 KBROM,24 KB thermo-src.zip — ROM source: asm + build.py + tableROM 原始碼:asm + build.py + 表 thermo.asm — view the source直接看原始碼
One-liner once unzipped: AprNes.exe --rom thermo.nes --openbus-temp 25 --time 6 --dump-mem 0013. Full source on GitHub: tools/aprnes/ · tools/thermo_rom/解壓後一行跑:AprNes.exe --rom thermo.nes --openbus-temp 25 --time 6 --dump-mem 0013。完整原始碼在 GitHub:tools/aprnes/ · tools/thermo_rom/
The tool工具A temperature knob in a real emulator在真模擬器裡裝一個溫度旋鈕
For a fast, iterative verification we used AprNes, the user's fast, cycle-accurate (master-clock) NES emulator, as the test bench. AprNes already tracked an open-bus latch but never actually decayed it (a leftover countdown that expired in ~14 ms, far too fast). We replaced that with the physical model from deep dive #3:
為了能快速、反覆地驗證,這個實驗用AprNes(使用者那顆快速、cycle-accurate 的 master-clock NES 模擬器)當測試台。AprNes 本來就追蹤一個 open-bus 閂鎖,但從沒真的讓它衰減(一段殘留的倒數 ~14ms 就到期、太快)。我們把它換成深入專文 #3 的物理模型:
- a lazy-timestamp decay: the latch is stamped with the current PPU-dot time whenever a PPU access drives it, and reads back as 0 once the elapsed time passes the decay period — zero cost in the hot loop;
- 懶惰時戳衰減:每次 PPU 存取驅動閂鎖時蓋上當下的 PPU-dot 時間,一旦經過的時間超過衰減週期,讀回就是 0 —— 熱路徑零成本;
- the decay period follows the Arrhenius law
t(T) = t0·exp(Ea/k·(1/T − 1/Tref)), witht0 = 600 msat 25 °C — so it is temperature-controlled; - 衰減週期依 Arrhenius
t(T) = t0·exp(Ea/k·(1/T − 1/Tref)),25 °C 時t0 = 600ms—— 所以受溫度控制; - only the PPU latch decays — the CPU external bus is re-driven by every instruction fetch, exactly as on hardware.
- 只有 PPU 閂鎖衰減 —— CPU 外部匯流排每次取指都被重驅動,和硬體一模一樣。
Then two headless CLI flags expose it:
再用兩個無頭 CLI 旗標把它露出來:
--openbus-temp <°C>   ; set the die/ambient temperature for the run (default 25)
--dump-mem <hexaddr>   ; print 8 bytes + the little-endian u24 at that CPU address at exit
So the temperature is a literal knob (hard-coded 25 °C by default; wire it to a UI later), and --dump-mem lets us read the ROM's result numerically instead of squinting at a screenshot.
於是溫度就是一個字面的旋鈕(預設寫死 25 °C,以後可接 UI),而 --dump-mem 讓我們用數值讀出 ROM 的結果,不用瞇著眼看截圖。
The test ROMTest ROMPrime, poll, count, invert, print充電、輪詢、計數、反推、印出
The ROM (tools/thermo_rom/, a plain NROM cart assembled with WLA-DX) is a five-step pipeline:
這顆 ROM(tools/thermo_rom/,用 WLA-DX 組譯的一般 NROM 卡帶)是一條五步管線:
- Prime — write
$FFto$2002(PPUSTATUS is read-only, so the write is ignored as a register op but still fills the open-bus latch, with no side effect). - 充電 —— 寫
$FF到$2002(PPUSTATUS 唯讀,所以寫入被當暫存器操作忽略、但仍填進 open-bus 閂鎖,無副作用)。 - Poll & count — tight-loop
LDA $2001 / CMP #$FF(reading a write-only register returns the full 8-bit open bus), incrementing a 24-bit counter until the first bit drops. That count is the decay time, measured in loop iterations. - 輪詢計數 —— 緊迴圈
LDA $2001 / CMP #$FF(讀寫入專用暫存器回傳完整 8 位 open bus),遞增一個 24-bit 計數器,直到第一個位元掉下來。那個計數就是衰減時間,以迴圈次數為單位。 - Invert — turn the count into a temperature (see §below).
- 反推 —— 把計數轉成溫度(見下節)。
- Print — write
NN DEGREE CELSIUSto the name table and turn rendering on. - 印出 —— 把
NN DEGREE CELSIUS寫進 nametable、打開渲染。
The one non-obvious thing (the whole reason the trick works) is that we watch the PPU's I/O latch, not a CPU open-bus address — the polling opcodes travel over the CPU bus and would overwrite it every fetch, so you'd read the last opcode, never the decay. The ROM's source is heavily commented as a tutorial.
唯一不明顯、也是整個訣竅成立的關鍵:我們看的是 PPU 的 I/O 閂鎖,不是 CPU open-bus 位址 —— 輪詢的 opcode 走 CPU 匯流排、每次抓取都會把它覆寫掉,你會讀到最後那個 opcode、永遠讀不到衰減。ROM 原始碼有大量教學註解。
Usage用法Build it, run it, read it建置、執行、讀取
# build the ROM (generates the lookup table, assembles, wraps as iNES)
python tools/thermo_rom/build.py

# run headless at 25 °C, dump the result, screenshot at ~5 s
AprNes.exe --rom thermo.nes --openbus-temp 25 --time 6 \
           --dump-mem 0013 --timed-screenshots "c_25.png:5.0"
;  MEM_DUMP 0013: ...  u24_le=25      -> 25 °C   (--dump-mem 0010 = raw decay count)
Two gotchas. (1) Cold runs decay slowly (0 °C ≈ 4.4 s of emulated time), so give --time headroom and screenshot a later frame — the screen stays black until the measurement finishes. (2) Under Git Bash, MSYS mangles the path:seconds argument (the : looks like a unix path-list separator) — use PowerShell for --timed-screenshots.
兩個雷。(1) 冷溫衰減慢(0 °C 約 4.4 秒模擬時間),--time 要留裕度、截更晚的幀 —— 量測完成前螢幕是黑的。(2) Git Bash 下 MSYS 會搞壞 path:秒數 參數(: 被當成 unix 路徑清單分隔符)—— 截圖那類指令請用 PowerShell。
It works它成功了The readout, across temperatures跨溫度的讀值

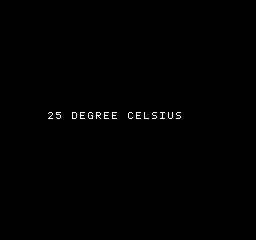


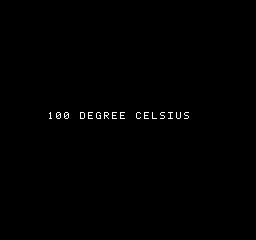
Real frame captures from the headless emulator: feed the knob a temperature, and the ROM — which only ever measured a decay count — reads it back on screen. Sweeping all 101 integer degrees, every one reads back exactly (0 mismatches / 101). A sample of the round-trip (set °C → displayed °C):
來自無頭模擬器的真實幀截圖:給旋鈕一個溫度,而這顆只量了一個衰減計數的 ROM,就把它讀回螢幕上。掃過全部 101 個整數度,每一度都精確讀回(0 誤差 / 101)。Round-trip 抽樣(設定 °C → 顯示 °C):
| set °C | 0 | 10 | 25 | 50 | 60 | 75 | 90 | 100 |
|---|---|---|---|---|---|---|---|---|
| displayed顯示 | 0 | 10 | 25 | 50 | 60 | 75 | 90 | 100 |
Exact across the whole range — no warm-end blur. (An earlier build wobbled above ~44 °C; that turned out to be a non-monotonic host clock in the emulator, now fixed — see below.) And remember: this "round-trip" only inverts the emulator's own model — see the note on circularity below.
整個範圍都精確 —— 沒有暖端 blur。(較早的 build 在 ~44 °C 以上會抖,後來發現是模擬器裡一個非單調的 host 時鐘,已修 —— 見下方。)也別忘了:這個「round-trip」只是把模擬器自己的模型反過來 —— 見下方關於循環的說明。
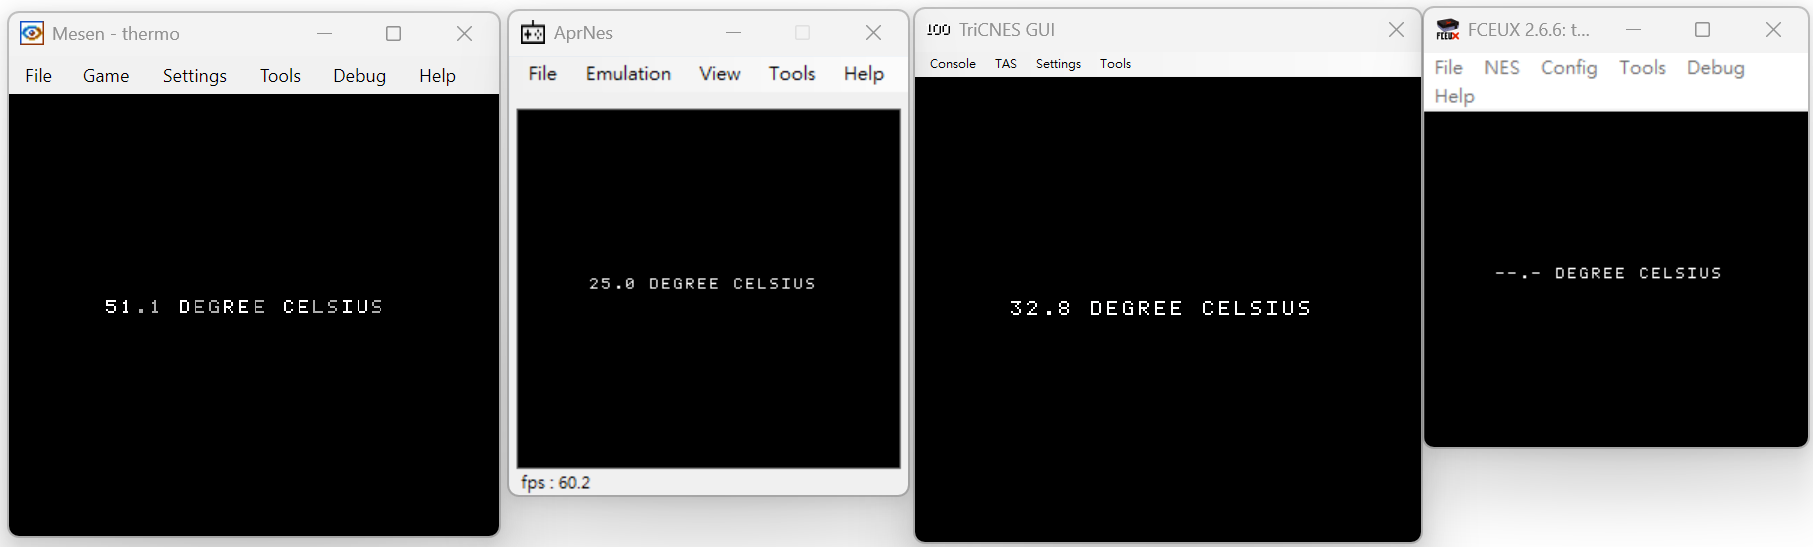
thermo.nes in four emulators — which turns it into an accidental survey of how each one models PPU open-bus decay. The specific numbers below are that build's calibration (under the current 0–100 °C integer table the classification is identical — only Mesen's clamp-hot value moves 51.1 → 100). The text renders in all of them (the ROM sets its own palette + attributes), but only AprNes, whose decay is calibrated to our table, reads the true 25.0. The other three land outside our range, in three different ways: TriCNES (32.8) decays within our range but with different timing — an in-range but uncalibrated reading; Mesen (51.1) pins to the very top of our range — its open bus decays far faster than our ~600 ms calibration covers (consistent with a coarse fixed-tick decay counter, like the ~14 ms one our own AprNes had before we replaced it), so the count falls below our table and clamps hot; FCEUX (--.-) never decays open bus at all, so the count never terminates and the ROM's no-hang guard fires. In other words 51.1 and --.- are not temperatures — they're the two out-of-range signatures: too-fast decay and no decay.(用較早的 0.0–51.1 °C 十進位 build 拍的。)同一顆 thermo.nes 在四個模擬器 —— 這讓它變成一份意外的「各家怎麼模擬 PPU open-bus 衰減」調查。下面的具體數字是那個 build 的校準(在現在的 0–100 °C 整數表下分類完全相同 —— 只有 Mesen「夾到最熱」的值從 51.1 變 100)。文字在每一個都顯示得出(ROM 自己設調色盤 + 屬性),但只有衰減對我們的表校準過的 AprNes 讀出真值 25.0。另外三個都落在我們範圍之外,而且方式不同:TriCNES(32.8)的衰減在我們範圍內、只是時序不同 —— 範圍內但未校準的讀值;Mesen(51.1)頂到我們範圍的正上限 —— 它的 open bus 衰減遠快於我們 ~600ms 的校準(符合一個粗略的固定-tick 衰減計數器,像我們自己 AprNes 換掉前那個 ~14ms 的),計數掉到表最小值以下、夾到最熱;FCEUX(--.-)完全不衰減,計數永不結束、觸發 ROM 的防卡死保護。換句話說 51.1 與 --.- 不是溫度 —— 是兩個超出範圍的簽名:衰減太快與不衰減。Bonus use — a one-ROM open-bus decay probe附帶用途 —— 一顆 ROM 的 open-bus 衰減探針
Flip the intent around and this test ROM becomes a tiny implementation probe: run it on any NES — emulator, famiclone, FPGA console, or original hardware — and what it prints classifies how that machine implements PPU open-bus decay, into four buckets, no source access needed.把用途反過來,這顆 test ROM 就成了一支迷你實作探針:在任何 NES 上跑 —— 模擬器、山寨機、FPGA 主機、或原廠實機 —— 它印出的東西就把那台機器怎麼實作 PPU open-bus 衰減分成四類,不用看原始碼。
- A plausible number in range → decay is modelled with timing near real hardware (~600 ms). Exactly right only on the build the table was calibrated for (AprNes → 25.0); otherwise it's a real but offset reading (TriCNES → 32.8).
- 範圍內合理數字 → 有模擬衰減、時序接近真實硬體(~600ms)。只有在校準表所屬的 build 上才完全準(AprNes → 25.0);其他是真實但有 offset 的讀值(TriCNES → 32.8)。
- Clamped to the top of range (
51.1in the survey's earlier build,100now) → decays far too fast, e.g. a coarse fixed-tick counter (Mesen here; also our own AprNes before we replaced its ~14 ms77777-tick timer). - 夾到範圍上限(調查那個較早 build 是
51.1,現在是100)→ 衰減快太多,例如粗略的固定-tick 計數器(這裡是 Mesen;也包括我們自己 AprNes 換掉那個 ~14ms 的77777-tick timer 之前)。 --→ open bus never decays (the value is held forever, or not modelled), so the count never terminates and the no-hang guard fires (FCEUX here; the survey image, from the decimal build, shows it as--.-).--→ open bus 完全不衰減(值被永久 hold,或沒建模),計數永不結束、防卡死保護觸發(這裡是 FCEUX;調查圖是十進位 build 拍的,顯示為--.-)。
On real hardware the same probe works, but only in one direction. A reading that tracks ambient temperature can only come from original analog NMOS silicon — a leaky floating node is the one thing that decays continuously with temperature. A dead or fixed reading only means the open bus is digital or actively held, which is equally true of famiclones, of Nintendo's own modern reissues (NES Classic, Switch Online — both emulation), and of accurate emulators. So it distinguishes original analog NMOS from a digital reimplementation — a chip-era / implementation characteristic, not authenticity and not genuine-vs-clone.在實機上同樣的探針也成立,但只有一個方向可靠。讀值會隨環境溫度變化只可能來自原始的類比 NMOS 矽晶 —— 只有會漏電的浮接節點才會隨溫度連續放電。讀到死值或固定值只代表 open bus 是數位實作或被主動 hold,而山寨機、任天堂自己的新機(NES Classic、Switch Online 都是模擬)、以及精確模擬器都一樣如此。所以它區分的是原始類比 NMOS 與數位重製 —— 一種晶片世代 / 實作特性,不是真偽、也不是正版 vs 盜版。
Calibration diagnostics校準診斷How the curve actually looks (for the statisticians)曲線實際長怎樣(給統計的人)
Because a calibration expert asked — and rightly noted you can't do a chemistry-style spike/blank pair for temperature — here is exactly how the calibration behaves. First, one thing that changes all the statistics: the emulator is deterministic. Running the same temperature five times gives the identical integer count (25 °C → 67001 every time), so per-point %RSD is strictly 0 — the uncertainty here is quantization (integer counts), not stochastic dispersion, and σ-based metrics (prediction intervals, LOD/LOQ) are degenerate.
因為一位校準專家問了 —— 而且正確指出溫度沒辦法做化學那種 spike/blank 對照 —— 這裡把校準的實際行為攤開。先講一件會改變所有統計的事:模擬器是確定性的。同一溫度跑五次得到完全相同的整數計數(25 °C → 每次 67001),所以per-point %RSD 嚴格為 0 —— 此處的不確定度是量化(整數計數),不是隨機散布,基於 σ 的指標(預測區間、LOD/LOQ)在此退化。
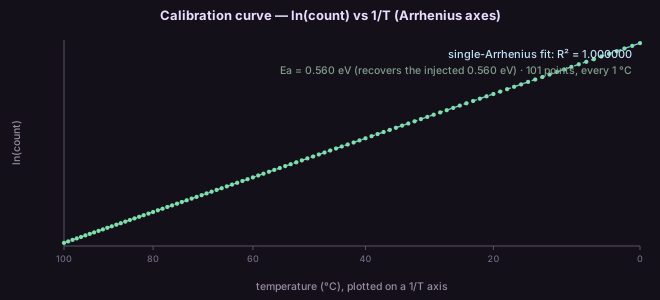
ln(count) vs 1/T, 101 points (every 1 °C, 0–100 °C). A single-Arrhenius log-linear fit gives R² = 1.000000, with an extracted Ea = 0.560 eV — which is exactly the activation energy the emulator was given, because the model injected is single-Arrhenius. The near-perfect fit is a consequence of the circular set-up, not evidence about silicon.Arrhenius 軸上的校準:ln(count) vs 1/T,101 點(每 1 °C,0–100 °C)。單一 Arrhenius log-linear 擬合 R² = 1.000000,反推 Ea = 0.560 eV —— 這正好是餵給模擬器的活化能,因為注入的模型就是單一 Arrhenius。近乎完美的擬合是這個循環設定的必然結果,不是關於真矽晶的證據。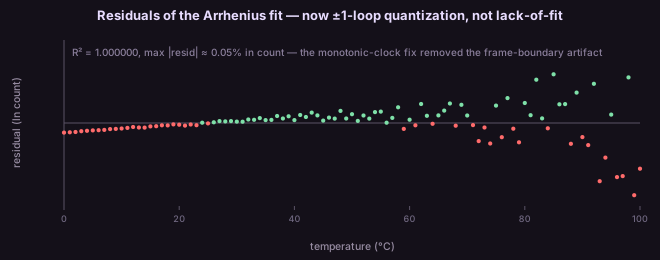
frame_count++ at scanline 240) that jumped the decay early near the warm end. Fixing the clock (deriving time from the monotonic CPU-cycle counter) collapsed the residuals to pure measurement granularity. We still build the table by dense measurement + interpolation in (1/T, ln count) — it passes through every point — but there is no longer a lack-of-fit hiding under the R².那個擬合的殘差現在只剩 ±1 圈量化噪聲(count 上最大 ≈ 0.05 %),散在零附近、沒有結構。這張圖較早的版本呈現教科書級的 lack-of-fit(冷端全負、中段全正)—— 但那個結構偏差是模擬器假影:一個非單調的 host 時鐘(frame_count++ 在 scanline 240)在暖端把衰減提早跳掉。修好時鐘(改用單調的 CPU-cycle 計數器算時間)後,殘差塌回純量測顆粒度。我們仍用密集量測 + 內插於 (1/T, ln count) 建表(通過每個點)—— 只是 R² 底下已經沒有 lack-of-fit 藏著了。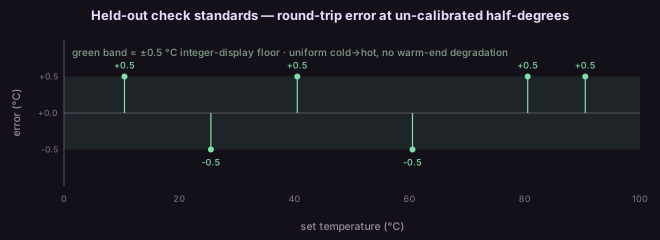
d(count)/dT stays large enough that every degree keeps its own count all the way to 100 °C (99→100 °C is still a 40-count step). The practical working range is the full 0–100 °C.高/低驗證:用不在整數校準內的半度溫度當獨立 check standard。round-trip 誤差是整個 0–100 °C 範圍一致的 ±0.5 °C —— 而且純粹是整數顯示的量化地板(把類比溫度捨入到整數度),不是校準誤差。關鍵是暖端不再退化:修好時鐘後,d(count)/dT 一路到 100 °C 都夠大,每一度都保有自己的 count(99→100 °C 仍差 40)。實用工作範圍就是完整的 0–100 °C。Raw data and the reproducible fit/residual/check script are in the repo: counts_by_degree.json · calib_stats.py. All of this validates the software pipeline on a deterministic emulator, not the physics — on real silicon %RSD becomes non-zero and proper chemometrics (replicates, thermal-chamber high/low, a fit that survives a lack-of-fit test) would apply.原始資料與可重跑的擬合/殘差/檢查腳本在 repo:counts_by_degree.json · calib_stats.py。這一切驗證的是確定性模擬器上的軟體管線、不是物理 —— 真矽晶上 %RSD 會非零,才需要正規 chemometrics(重複量測、thermal-chamber 高/低、通過 lack-of-fit 檢定的擬合)。
Count → Celsius, on a 65026502 上 count → 攝氏No multiply, no divide, no float不乘、不除、不浮點
Inverting an Arrhenius curve means a logarithm and a reciprocal — miserable on a 6502. So we do none of it at runtime. On the PC side, build.py precomputes the whole curve as an integer-°C lookup table: thr[i] = the count you would measure at temperature i − 0.5 °C, for i = 0..100 (so the index is the temperature in whole degrees; entries 101–127 are 0 padding so the fixed-width search clamps at the hot end). The table decreases (cold = big count).
反推 Arrhenius 曲線要對數和倒數 —— 在 6502 上很痛苦。所以我們在執行期一個都不做。PC 端 build.py 把整條曲線預先算成一張 整數 °C 查表:thr[i] = 在溫度 i − 0.5 °C 會量到的計數,i = 0..100(所以 index 就是整數度;101–127 是 0 padding,讓固定寬度的搜尋在熱端 clamp)。表遞減(冷 = 計數大)。
The ROM then finds "the largest index whose threshold is still ≥ our count" with a 7-step power-of-two binary search — building the 7-bit index (0–127) one bit at a time, no division. Finally it formats the index as a decimal integer with repeated-subtraction BCD (subtract 100s and 10s, count the subtractions) and leading-zero blanking. The approach — lookup + radix search + subtraction BCD — was the division-free path recommended by a 6502 consult.
ROM 再用 7 步 2 的冪次二分搜找「門檻仍 ≥ 我們計數的最大 index」—— 一次組一個 bit 出 7-bit index(0–127),不用除法。最後用連減法 BCD(反覆減 100、10 數次數)+ 前導零消隱把 index 格式化成十進位整數。這條路 —— 查表 + radix 搜尋 + 連減 BCD —— 是一次 6502 諮詢推薦的免除法做法。
; the whole search — 7 iterations, no MUL/DIV
    lda #0 / sta idx      ; idx = 0, step = 64
rx_loop:
    ; test = idx + step ; if thr[test] >= count: idx = test
    jsr read_thr          ; fetch the 24-bit threshold (SoA: thr_lo/mid/hi)
    lda tblL / cmp cnt0     ; 24-bit compare via CMP + SBC chain
    bcc rx_next           ; thr < count -> don't set this bit
    ...                     ; else idx = test
    lsr stp               ; step >>= 1, loop until 0
    ; idx (0..100) == temperature in whole degrees C
Where it's rough哪裡粗糙Honest limits — it's a validation, not a product誠實極限 —— 這是驗證,不是產品
- The warm-end blur was a bug, and it's fixed. An earlier build lost resolution above ~44 °C — adjacent degrees shared a count (43 and 44 °C both read the same), which we almost wrote off as "fast decay = coarse count, real physics." It wasn't. The emulator's time helper (
NowDots()) derived the clock fromframe_count/scanline/x, andframe_count++fires at scanline 240 (a host-side render boundary), so the clock jumped a whole frame there and tripped the decay early whenever the decay period fell near one frame — exactly the warm end. DerivingNowDots()from the monotonic CPU-cycle counter (mcCycleCount × 3) fixed it; the change touches only the open-bus helper, not any game-visible timing, so AccuracyCoin/blargg are unaffected (ppu_open_bus+ppu_read_bufferstill PASS). Now every degree 0–100 °C has its own count and the round-trip is per-degree exact; the only residual error is the ±0.5 °C of integer rounding (uniform cold-to-hot). A good reminder to distrust a too-convenient "it's fundamental physics" explanation. - 暖端 blur 是 bug,而且修好了。較早的 build 在 ~44 °C 以上失去解析度 —— 相鄰度共用一個計數(43 和 44 °C 讀到相同值),我們差點把它當成「衰減快 = 計數粗,真物理」寫掉。它不是。模擬器的時間輔助函式(
NowDots())用frame_count/scanline/x算時鐘,而frame_count++在 scanline 240(一個 host 端渲染邊界)進位,所以時鐘在那裡跳了一整幀,只要衰減週期接近一幀就把衰減提早觸發 —— 正好是暖端。把NowDots()改用單調的 CPU-cycle 計數器(mcCycleCount × 3)就修好了;這個改動只碰 open-bus 輔助函式、不碰任何遊戲可見時序,所以 AccuracyCoin/blargg 不受影響(ppu_open_bus+ppu_read_buffer仍 PASS)。現在 0–100 °C 每一度都有自己的計數、round-trip 逐度精確;唯一殘留誤差是 ±0.5 °C 的整數捨入(冷熱端一致)。這是個好提醒:別太快接受一個太方便的「這是根本物理」解釋。 - Range is clamped. The table covers 0–100 °C; anything colder or warmer pins to the ends (and reads
--when colder than the range or when open bus never decays). - 範圍會 clamp。表涵蓋 0–100 °C;更冷或更熱都夾到端點(比範圍冷、或 open bus 完全不衰減時讀
--)。 - It's a per-model calibration. The count depends on the emulator's exact loop timing, so the lookup table is calibrated to this build of AprNes. On real silicon the absolute offset differs per console (a one-point calibration fixes it — the Arrhenius slope is universal, only the offset moves).
- 這是逐模型校準。計數依賴模擬器確切的迴圈時序,所以查表是對這個 AprNes build 校準的。真矽晶上絕對 offset 逐台不同(一點校準即可修正 —— Arrhenius 斜率普世,只有 offset 會動)。
- Emulator ambient ≠ hardware room. Here the knob is literal ambient temperature. On a real NES the PPU self-heats +30–40 °C, so the same ROM would read the die temperature unless cold-booted and read within seconds. The emulator sidesteps that — which lets us exercise the software mechanism cleanly (but doesn't prove the real-hardware model — see below).
- 模擬器的環境溫度 ≠ 硬體室溫。這裡旋鈕是字面的環境溫度。真 NES 上 PPU 自體發熱 +30–40 °C,同一顆 ROM 會讀到晶粒溫度,除非冷開機幾秒內讀。模擬器繞過這點 —— 這讓我們乾淨地跑通軟體機制(但不證明真硬體模型 —— 見下)。
- The round-trip is circular — this is the key caveat. The emulator sets decay = f(T); the ROM computes T = f⁻¹(decay). Recovering the input temperature is therefore guaranteed by construction — it proves the software (measure → invert → display) is correct, and nothing about whether the model is right on real silicon. A real validation needs real hardware and an external reference thermometer, which is future work.
- round-trip 是循環的 —— 這是最關鍵的但書。模擬器設 decay = f(T);ROM 算 T = f⁻¹(decay)。拿回輸入溫度是先天保證的 —— 它只證明軟體(量測 → 反推 → 顯示)正確,完全不證明模型在真矽晶上對不對。真正的驗證需要實機 + 外部參考溫度計,是未來的工作。
- Arrhenius is a first-order model.
Ea ≈ 0.56 eV≈ Eg/2 is the generation–recombination leakage that dominates near room temperature; above ~80–100 °C diffusion current (Ea ≈ Eg) kinks the slope, and the measured time also depends onC(V), the read-buffer threshold-voltage drift (~−2 mV/°C), and VDD. Our emulator uses the single-Arrhenius law; a faithful model would layer these in. - Arrhenius 是一階模型。
Ea ≈ 0.56 eV≈ Eg/2 是室溫附近主導的 generation–recombination 漏電;~80–100 °C 以上擴散電流(Ea ≈ Eg)讓斜率折點,量到的時間還取決於C(V)、讀取緩衝閾值電壓漂移(~−2 mV/°C)、VDD。我們模擬器用單一 Arrhenius;忠實模型要把這些疊進去。 - No ground truth for calibration. On real hardware the die self-heats and there's no on-chip thermal sensor, so software can never read the true junction temperature to check its calibration against — external package temperature is only a thermal-gradient-error proxy. This is a fundamental limit; the honest framing is a relative instrument.
- 校準沒有 ground truth。真硬體上晶粒自體發熱、又沒片上溫度感測器,軟體永遠讀不到真接面溫度去對照校準 —— 外部封裝溫度只是隔著熱梯度誤差的 proxy。這是根本限制;誠實的定位是一把相對儀器。
So, honestly: this shows a physical model of an emulator "bug" (open-bus decay) given a temperature dependence, and a stock 6502 program reading that dependence back out as a number. The software pipeline works end-to-end. Whether the underlying model matches real silicon is a separate, unproven question — one deep dive #3's corrections now spells out, with thanks to the NESdev reviewer who pushed on exactly these points.
所以,誠實地說:這展示了一個模擬器「bug」(open-bus 衰減)的物理模型被給了溫度相依,以及一支原廠 6502 程式把那個相依讀回成一個數字。軟體管線端到端可運作。底層模型是否符合真矽晶,是另一個、還沒被證明的問題 —— 深入專文 #3 的更正現在把它講清楚了,並感謝那位正好戳中這些點的 NESdev 審閱者。
← back to deep dives · the theory: deep dive #3← 回深入專文 · 理論篇:深入專文 #3